Create powerful portfolio websites using Hugoblox
 Fully functional website with rich features.
Background
Who doesn’t love a fully functional and easy to maintain website to showcase personal resume or CV over the internet! I do for sure. I have been using GitHub pages and static HTML+CSS pages (using one from https://html5up.net/) to showcase my personal portfolio for a while. Github pages offers the flexibility to quickly modify things locally and push the updated changes which is then easily reflected on the github page with custom domain functionality as well. While the HTML and CSS pages have been working up very well, I have missed the opportunity of writing regular blogs on my website. There are tons of HTML+CSS templates out there with blogging features, but during my search, I found Hugo.
Hugo is powerful tool for scientists and professionals to create beautiful websites without any coding. The best thing of Hugo is that most of its uniqueness relies on markdown and several yaml fiels, making it very customizable and easy to maintain. Hugoblox (https://hugoblox.com/) is built on top of Hugo and provides more feature rich templates for customization. Hugoblox has neumerous templates to choose from. I liked the academic CV template, which is completely free. The complete instructions on how to use the template are provided in their documentation (https://docs.hugoblox.com/). However, while I was exploring the options, I found some issues while setting Hugo locally on my Mac due to some version issues. Therefore, in this article, I will briefly explain each major steps I took and mention what did not work for me along with the workarounds.
Creating a repository in github using the provided template
- Go to the Academic CV template site and click the
Editbutton. - This will take you to the
Create new repositorypage of your github (you need to be signed in or else it will ask you to). But it will use the template version of this site so once you create your repository, it will bring in all the template files of this site. - The name of the repository should be
<your_github_username>.github.io. This will tell github to make it a github page within the workflow. - You need to make the repository
Publicto show it as a github page. - After creating the repository, wait some time and in a browser, type in
<your_github_username>.github.io. This should show you the Academic CV demo site, which means github pages is working. If you make changes to this newly created repository based on your personal information, that should be reflected to the website as well.
Run things locally
The basic instructions in the documentation talks about changing things on github codespace, which is a web-based version of VSCode integrated with Github. While this is great, it takes some time to take the changes effect after updating each component. I find it more useful doing things locally, check how the website is looking after each change and the push all the updates to the github repository.
The documentation clearly shows the steps needed for setting up things locally. However, I found some version issue while working on macOS.
I first installed
hugousinghomebrewby doingbrew install hugoin my terminal. However, whenever I wanted to serve the Academic CV template using thehugoI just installed, it was trhowing me rendering error. After many search, I found that this template only works with a specific version of hugo, which isv136.5.Download the hugo_extended_0.136.5_darwin-universal.tar.gz from its previous releases stored in the github repository of Hugo.
After downloading it, extract it in terminal:
tar -xzf hugo_extended_0.136.5_darwin-universal.tar.gzMove this to your applications directory.
sudo mv hugo /opt/homebrew/bin/   # Apple Silicon
sudo mv hugo /usr/local/bin/   # Intel Mac
Verify the
hugoversionhugo versionInstall the other dependencies of
hugousinghomebrewbrew install git golang nodeI used VSCode and Git to connect to my Github account and then clone the newly created
<myusername>.github.ioin my local directory. Then after making some simple changes to the template, cd into the project directory and run the following command:hugo server -DThis will start running the output of the website in
http://localhost:1313/. Open any browser and put that in the address bar to see the live website locally. Any changes saved will show the output in this address. This is much easier to work with as the changes take effect almost immediately.
Change the template tuned to personal needs
- The documentation provides detailed list of what to change for the customization of the template. However, key points are:
assets/mediaholds all the icon and banner files. The website icon is by default the icon of Hugo, which can be changed by placing any 512 by 512 icon file asicon.pngin theassets/medialocation.config/_defaulthas several.yamlfiles which are responsible for the key components of the site. Each file has enough comments to explain what each variable does.contentis the main portion of the template.authors/admin/_index.mdhas a lot of customizable information about the author.- All other directories are self explanatory. Mainly, the
_index.mdfiles in each directory are the key files to change.
Custom domain name on github page
- Github page also allows the use of custom domain name. I have a personal domain bought from squarespace.com. To use a custom domain properly, you have to go to your
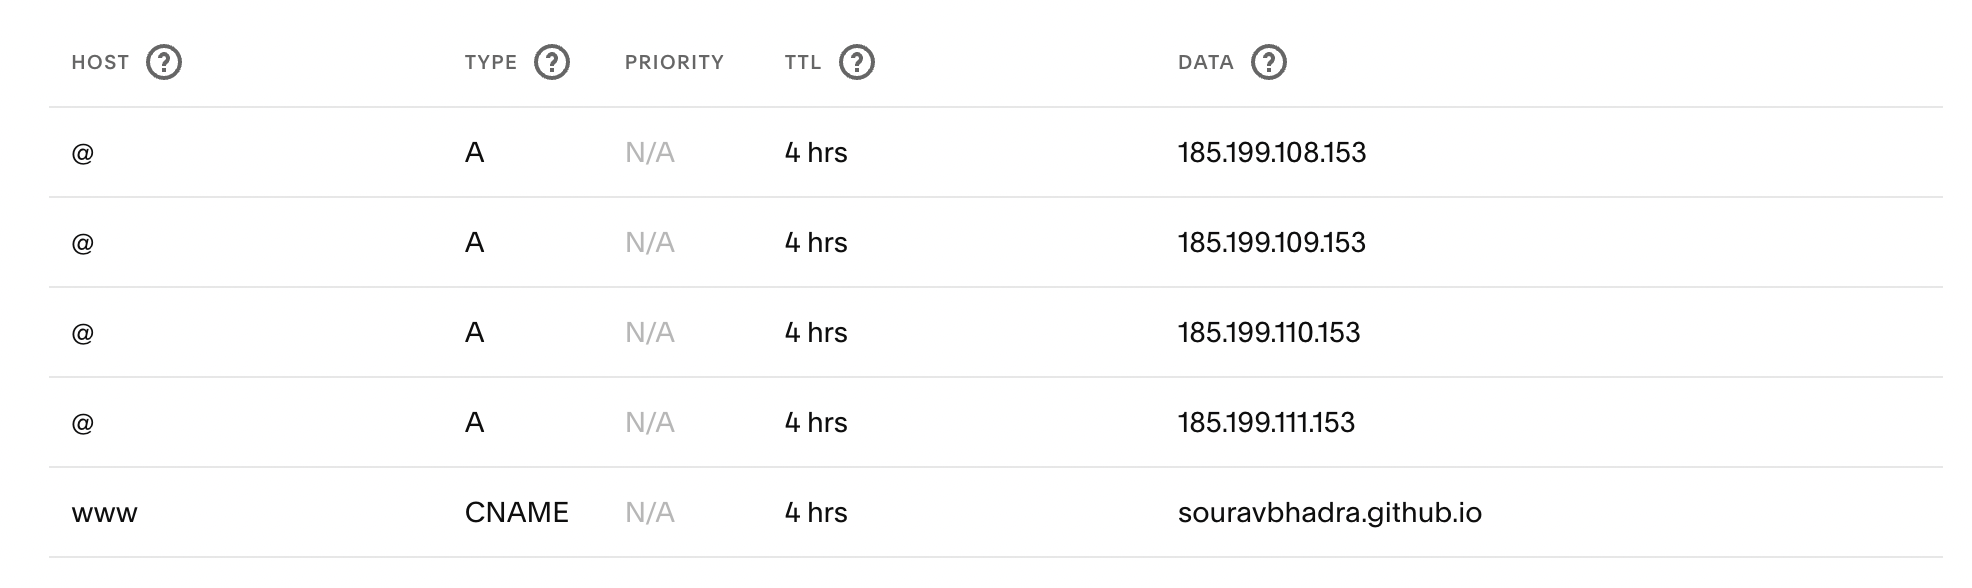
<username>.github.iorepository, clickSettings, findPagesfrom the menu on the left side, put down you custom domain name on the placeholder calledCustom domain. - Go to this link and you will find a list of 5 A numbers here.
- Go to the DNS settings on your domain. Remove any preexisting default records from there. For Squarespace, there were some default prameters in the DNS settings, which I needed to remove first. Without removing those, the domain was not working properly.
- Add the A numbers there like below. Also add a CNAME record that points it to your github repository.
- Give it some time to perform the DNS check from github’s end. Sometimes it may take few hours to do the check. Once the DNS check is successful, you should see your website live on the custom domain. Also make sure to check the
Enforce HTTPSto enable extra layer of security.
Final remarks
That’s it. Super simple and efficient way to manage personal website. There are numerous other templates available in both Hugoblox and Hugo for free with different use cases. As a scientist, I find Hugo very easy-to-use due to it’s integration with markdown pages.